Tuesday, March 26, 2013

Grinding and Filling

After the glass is up the hard labor part of the job is starting to pass.  The next most important task is rough grinding the glass to prepare for the fairing process.

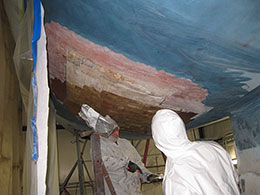
The nice part about fiberglass is that it is really light and really strong. The challenging part about fiberglass is that it is really strong.  That means sanding is a challenge. You are going to want to use the right tools.  For our rough sanding, we use an air powered 8” ‘mud buster’ with a Hook It disk.


The filler we used is a 3M product – 5816 Milled Fiberglass filler.


This filler is great because it has strength with the milled fiberglass in it and it is a polyester base with cream hardener, so it is fast curing and you can apply several coats in a day and grind between coats, plus it is water proof and can be used under the water line
We use air powered tools for 2 reasons.  The first and most important is that they are lighter.  In our current job, we are working over our head so weight is key.  The other reason is that since it is air powered and our compressor is 240 volt 3 phase, we are using a lot less electricity.
Once we started the grinding process and removed the big highs, we brought in the cardboard templates we made before we started the demo phase of the project.  This gave us a rough guide in our quest for the perfect repair.  It also provided a good, cheap tool for constant checking on hull shape.


For the first pass, we used a 24 grit disk to knock down the big highs and get a general rough surface started.

This was a fairly fast process and set us up for the 40 grit disk, which we used to bring the perimeter of the new glass close to the level of the surrounding gel coat. In the process of grinding, we took out the highs and we also were able to detect our lows.


Once this was accomplished we were able to start the long process of filling in the repairs.


We applied the filler to the lows.  In our case we had some aft and some in the middle.  We started with the lows aft. When we had them filled, we used 40 grit disks on the mud buster again and ground this patch down.

We then spread filler into the low spot in the center of the repair, let it set up and then ground that down. 


Now we have the two principle low spots starting to take shape and follow the contour of the hull.  I repeat starting.  This is key because at this point we can start to fill in the whole repair and work toward a uniform surface that is ready to fair.


Next we covered the whole repair with a uniform coat of filler, let it set up


and came back with the 40 grit and prepped it for fairing.


Next is fairing

Monday, March 4, 2013

Skyway Yacht Works Fiberglass and Paint Shop

Today, just about every boat on the water is made of fiber reinforced plastic or fiberglass.  Fiberglass is a great product and lasts forever.  It is virtually indestructible and infinitely repairable.  These are the qualities that make it ideal as a building material for boats and make fiberglass repair affordable.  You can take an old boat with extensive damage and make it look like new, using widely available materials.

At Skyway, we do that often.  Our new fiberglass, paint and repair shop has dedicated vacuum and air extraction systems as well as radiant heat and high volume air compressor.

We have the ability to find and repair delamination, repaint and fair even the oldest boat.  For our ‘relaminating’ process, we use vacuum bagging technology with a high powered vacuum, which allows us to laminate bigger pieces of wetted glass and more of them. This keeps the cost of repair down.
Our current project involves finding and removing some delaminated wet balsa core in a mature J-Boat with vinylester over  glass,

Moisture on board

Bagging the core

We cut out the wet core, replaced it with new vinylester and  cabosil-saturated ¾ “ end grain balsa and vacuum bagged that in place, then vacuum bagged up the new, 1708 biaxial fiberglass cloth also saturated with vinylester.


We will grind it to rough contour and begin the fairing process.  After that, we will be covering the repairs with polyester gel coat, machine sand that to an 80 grit scratch, then apply Pettit’s PettitProtect epoxy based barrier coat, inking it and then fairing that down with a longboard.  Then we will straighten the center line of the boat, recore the rudder and fair the keel.

Recoring the rudder 

When all the barrier coat is faired, we will spray it with VC Offshore.

The whole project will take about 4 weeks,


The fiberglass pieces we put up  measured 76” x 53”.  It took five of us working feverishly for 1 hour to get up three sheets of 1708 biaxial cloth (about 84 sq. ft.).

The fiberglass process went like this: First we dry wiped the side of the hull where the vacuum bag was to go.  Then we wiped down the hull with a solvent to clean it for the tape.  We measured the overall size of the balsa repair, cut the first fiberglass cloth to fit 4 inches outside of that all around and each succeeding piece 4 inches larger, cut the vacuum bagging film 10 inches bigger than that and taped the top edge film to the side of the boat, such that it hung down from approximately 10 inches above the repair.

Bleeder cloth

We then cut the bleeder cloth slightly smaller than the bagging film and then cut the peel ply slightly smaller than that.

Since the repair was so massive, we kept the breather cloth and peel ply off to the side so it would not get tangled up in the wetting out and attachment process. 

Next, came wetting out the balsa core on the boat and the cloth on the shop floor with the vinylester resin prior to putting it up on the boat, then bagging the whole thing.

Wetting out the core

Wetting out the biax


When the cloth was wet, we folded it into 8 inch horizontal folds (along the 76 “ axis) so we could safely carry it to the boat and start the adhesion process.  This was a bit stressful, since the cloth was so heavy with the resin from the pre-wetting that it seemed like it might fall off the boat--it did not(if we used less resin, we found that the cloth would not stick to the boat, even though it was lighter).

Next comes adhesion.  We put up the first sheet and rolled it out –no problem.  The second sheet, being slightly bigger was a bit tougher to handle and required a couple additional sets of hands.  We finally wrangled it under control and got it to stick in the proper place on the boat.  The third piece actually went quite well until we were set to attach the peel ply-then it was a bit of chaos, since we could not find the cut sheet -- and the curing resin doesn’t care.  We cut another piece of peel ply, stuck it up, rolled it, and put on the breather cloth.  When that was all in place, we taped up the bagging film and fired up the vacuum.

4 hours later we had a new bottom.


Next comes—

  • Grinding
  • Fairing
  • Gelcoat over patch
  • Barrier coat
  • Layout fluid
  • Long board
  • Refairing
  • Spray VC Offshore
  • Sand to 800 grit

Wednesday, January 9, 2013

Welcome to our new blog site!

Welcome to our new blog website. You will find helpful information and tips posted here.

Situated in Chicago just a mile and a half off of Lake Michigan on the Calumet River, Skyway Yacht Works offers a convenient solution to your boat storage needs - either commercial or recreational.
Located in Chicago just off of 100th St., Skyway Yacht Works haul-out facility and gleaming indoor storage and outdoor boat yard are ideally situated for boaters from the Chicago and Northwest Indiana area.  Our landmark-the Skyway Bridge-is easy to spot and when you arrive for haulout, you will pull off the main river channel into our slip-safely away from the river traffic.